
- What DNS provider can I use?
- How do I change the DNS on the WiTopia Client
- How do I change the DNS on OSX 10.5+ (10.5-10.12+)
- How do I change the DNS on OSX 10.4
- How do I change the DNS on Windows Vista, 7, 8, 8.1, 10
- How do I change the DNS on Windows XP
- How do I change the DNS on Linux
- How do I change the DNS on Android
- How do I change the DNS on iOS (iPhone, iPad, iTouch)
What DNS provider can I use?
These are NOT WiTopia controlled DNS providers, rather alternate global anycast DNS providers you can use with the VPN service.
Global DNS Providers |
||
| Cloudflare: 1.1.1.1 | Quad9: 9.9.9.9 | Google: 8.8.8.8 |
| CiscoDNS: 208.67.222.222 | FreeNOM: 80.80.80.80 | BackPlane DNS: 172.98.193.42 |
| CleanBrowsing: 185.228.168.9 | AdGuard DNS: 176.103.130.130 | Alt DNS: 198.101.242.72 |
If you are looking for geospecific DNS please see the OpenNIC Project DNS Servers we have included some above also.
How do I set the DNS with WiTopia's Client
You can set the DNS on the WiTopia client directly in the WiTopia Client.
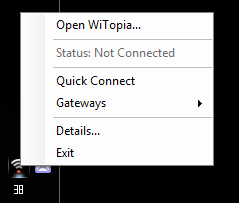
- Open the WiTopia client by right clicking on the icon in the taskbar

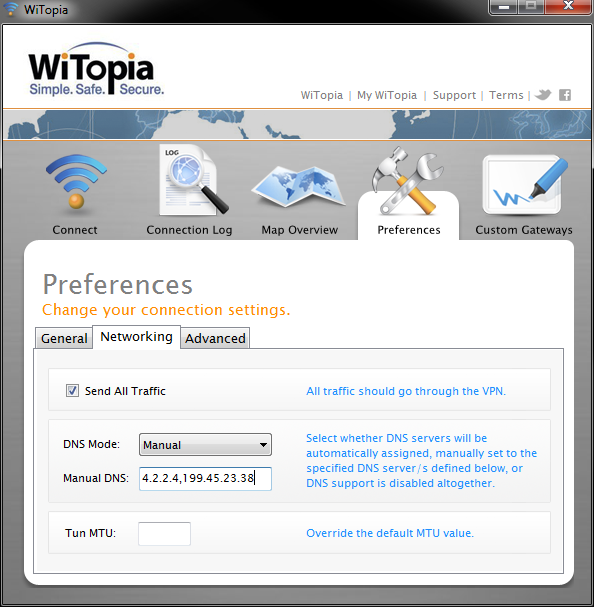
- Click on Preferences -> Networking and change the DNS MODE to Manual

You will need to enter DNS IP addresses in the space. Please CLICK HERE for DNS provider options
How do I set the DNS In OSX 10.5-10.9
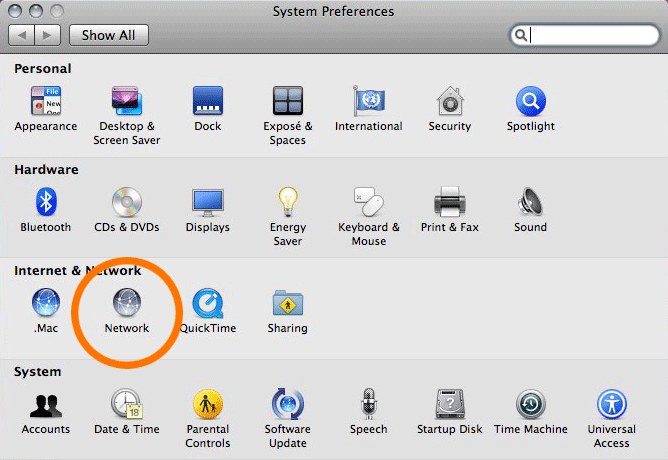
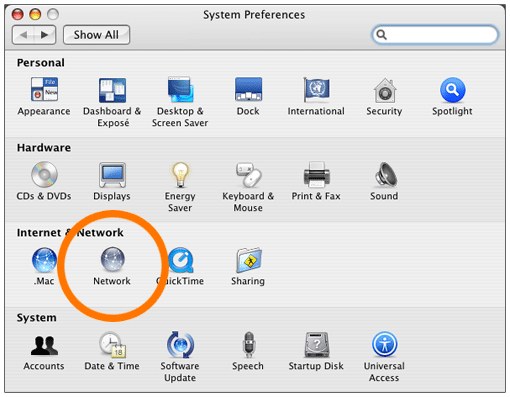
- Click on the Apple Logo (upper left corner) and choose System Preferences
- Click on the Network Icon
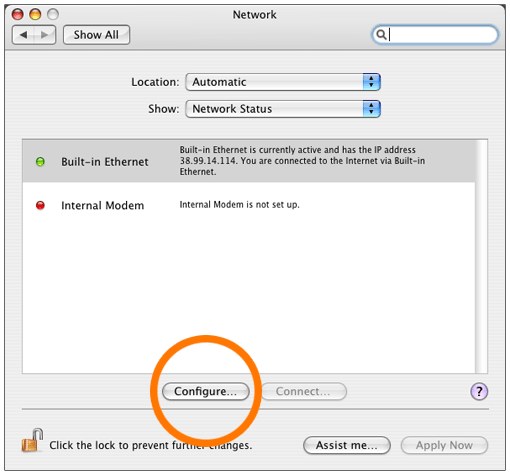
- Highlight the Ethernet or Airport interface and click configure
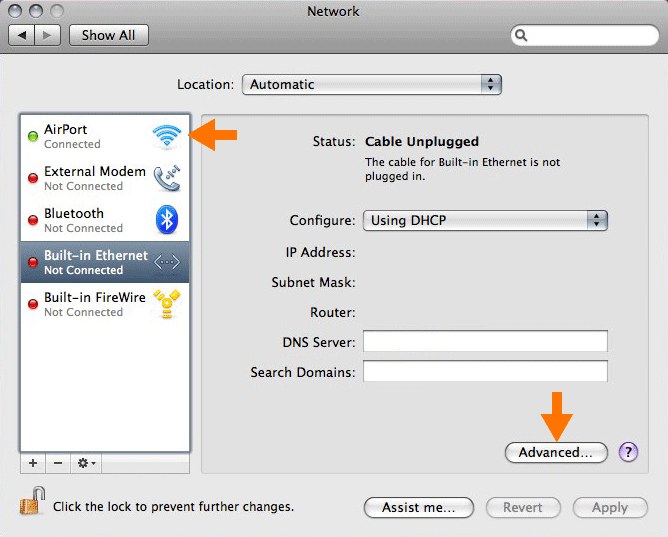
- Click on the DNS tab
- Click the plus sign (bottom left) and type In our DNS (one per line)
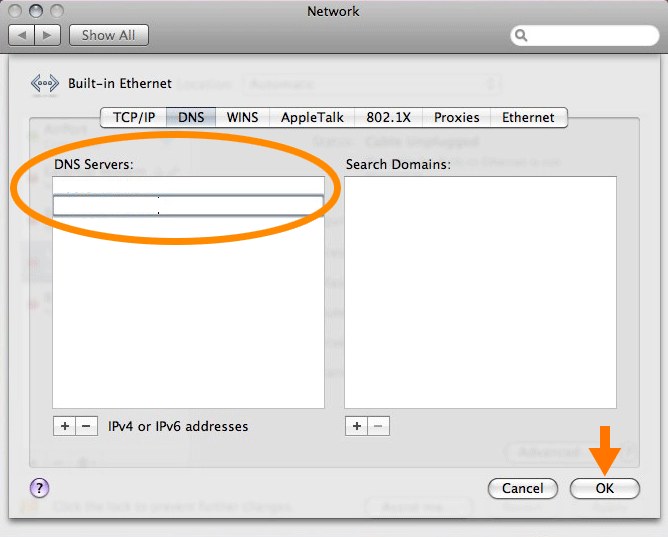
You will need to enter DNS IP addresses in the space. Please CLICK HERE for DNS provider options
- Click Ok
- Click Apply on the interface selection screen again.
- Restart your computer and the new DNS will be used
How do I set the DNS In OSX 10.4
- Click on the Apple Logo (upper left corner) and choose System Preferences
- Click on the Network Icon
- Highlight the Ethernet or Airport interface and click configure
- Type In our DNS (one per line)

You will need to enter DNS IP addresses in the space. Please CLICK HERE for DNS provider options
- Click Apply Now
- Restart your computer and the new DNS will be used
How do I set the DNS In Windows Vista-8.1
- Open Network Connections by:
- clicking the Start button

Windows 8 and 8.1 hold the windows key and press X to bring up a secret menu and click on control panel
- clicking Control Panel
- clicking on Network and Internet
- clicking on Network and Sharing Center
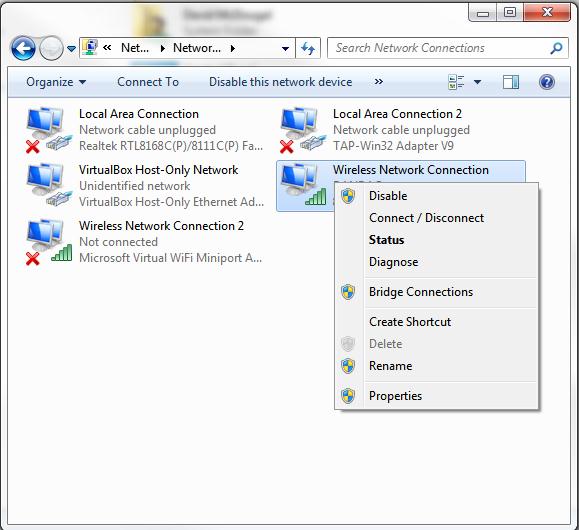
- clicking on Change Adapter Settings
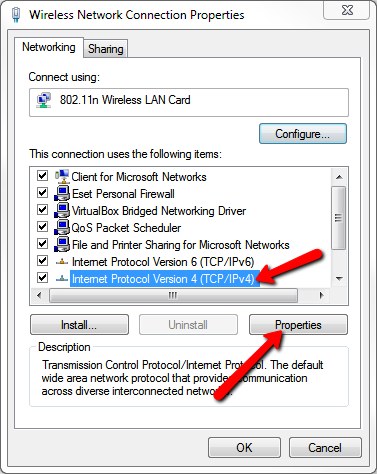
- Right-click the connection that you want to change, and then click Properties
You will see the ![]() icon meaning you need to enter your local computer admin password, or click ok to authorize the change.
icon meaning you need to enter your local computer admin password, or click ok to authorize the change.
- Click the Networking tab. Under This connection uses the following items, click Internet Protocol Version 4 (TCP/IPv4), and then click Properties.
- Click Use the following DNS server addresses, and then, in the Preferred DNS server and Alternate DNS server boxes, type the addresses of the primary and secondary DNS servers.
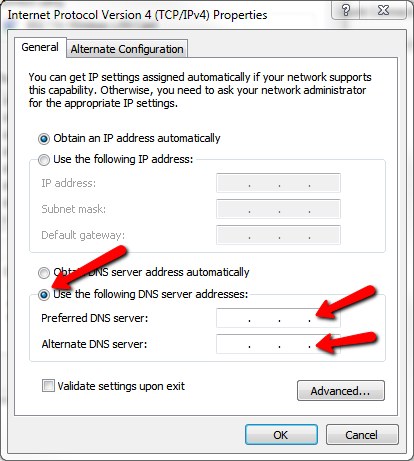
You will need to enter DNS IP addresses in the space. Please CLICK HERE for DNS provider options
- Click ok to save the changes
- Restart your computer and the new DNS will be used
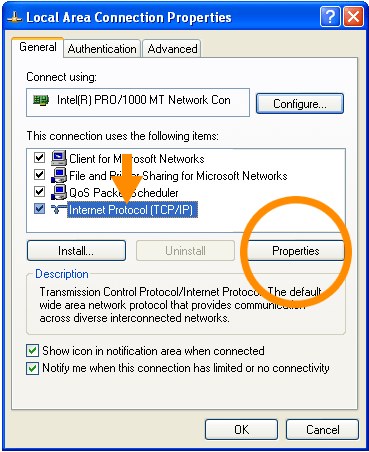
How do I set the DNS In Windows XP
- Click Start -> Control Panel -> Network and Internet Connections.
- Right-click Local Area Connection that you wish to change and then click Properties.
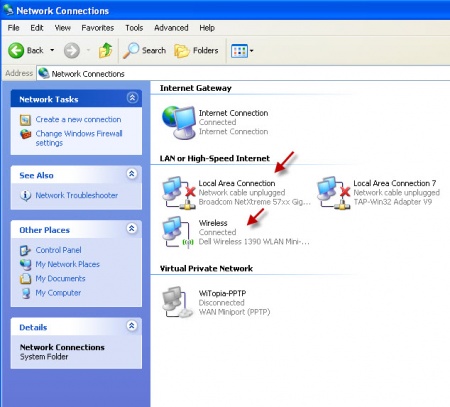
You will want to change the settings on your MAIN Local Area connection and Wireless connection. NOT the TAP-32 labeled interface
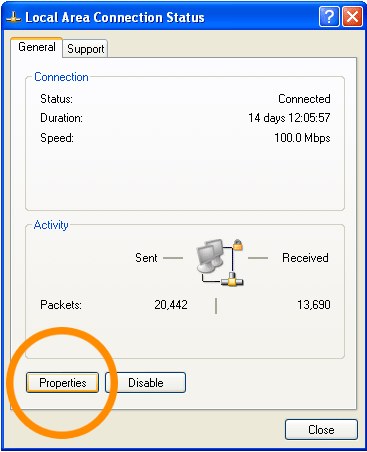
- Click the Internet Protocol (TCP/IP) and then click Properties.
- Click Use the following DNS server addresses, and then, in the Preferred DNS server and Alternate DNS server boxes, type the addresses of the primary and secondary DNS servers.
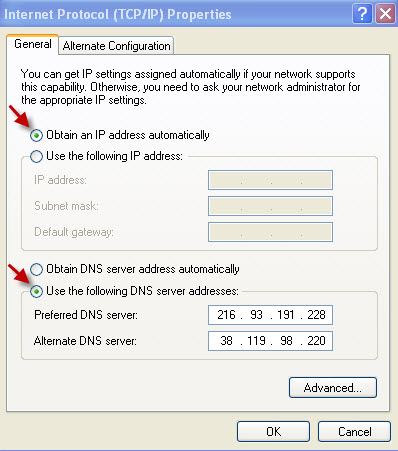
You will need to enter DNS IP addresses in the space. Please CLICK HERE for DNS provider options
- Click ok to save the changes
- Restart your computer and the new DNS will be used
How do I change DNS in Linux?
Setting the DNS on most version of linux involves using the terminal (command line) and editing the /etc/resolv.conf file. Their may be a GUI option for your specific OS, please see the forums for your OS of choice for more details.
command line
- Open terminal
- Type: sudo gedit /etc/resolv.conf
this will call the gnome editor. You can replace “gedit” with the editor of choice.
- With editor open make an entry for each nameserver in the format below:
- nameserver IPADDRESS
- nameserver IPADDRESS
- Please CLICK HERE for DNS Options to Input
- Save the file
- Restart the computer
network manager
- Right click on the network manager icon
- Choose edit connections
- Click on the wired or wireless (depending on what you are using)
Highlight your connection and choose “edit” - Now click on the IPv4 tab
- Change the dropdown to DHCP ADDRESS ONLY
- Now in the DNS Servers section add your DNS addresses seperated by a comma
Please CLICK HERE for DNS Options to Input
- Click apply
- Click Close
- Restart the computer to apply the settings
How do I change the DNS on iOS?
- From the iPhone's home screen, tap Settings.
- Tap Wi-Fi. The screen shown below appears. The available wireless networks in range of your iPhone appear, as shown below.
- Find your wireless network in the list, and then click the arrow. The screen shown below appears.
- Tap the DNS field.
- Delete the current DNS servers, and enter the new DNS servers. (If you enter more than one DNS server, be sure sure to separate the servers with commas.)
You will need to enter DNS IP addresses in the space. Please CLICK HERE for DNS provider options
How to change DNS on Android?
DHCP via WiFi
- Open your settings section
To access settings either swipe down from top and click on the cog icon. The other option is to locate the settings option in your applications folder.
- Click on wifi
- Long press on the wifi you are connected to and click modify
On some devices, you may need to check the box for "Advanced" to see further settings. To adjust your Android DNS settings, you will need to switch the IP settings from DHCP to Static. Once changed, the menu will appear with the DNS settings available to edit. Don't worry about the editing the IP address as the Android device will fill in the IP address it has acquired through DHCP.
- Enter DNS enteries in DNS1 and DNS2
Click Here for suggested DNS providers
- Click on save
- reboot the phone to clear DNS cache
STATIC IP addresses are not used over 3/4G Data networks. Please see below for the directions on how to set the DNS on a DHCP (99% of connections).
- Click on Settings in your applications screen
- Click on Wireless & networks option
- Click on Wi-Fi settings
- Click on the menu button for your phone
- Click on Advanced
- Click on the STATIC IP option
- Fill in your local network static IP details
this does not pertain to the WiTopia VPN services and is local to your network only
- Click on the down arrow for each DNS field and input a dns option
- CLICK HERE for DNS Server Options for a list of locations to choose
- Click the menu button to bring up the save button
- Save
The DNS should now be set for this wifi network (only).
To change the dns for a dhcp (99.99% of connections)
Google did not make this option available if you are using DHCP (most people are). You can see on their issue tracker that this is a known issue. If you are using a STATIC IP on your network though you can set the DNS on WIFI only. There is no ability to change the DNS for the cellular data network (without rooting, and hacking the phone which we do not support). If you have rooted your phone, there is a free application in the market that you can use to set the DNS for usage on wifi or 3/4G service. Please see CLICK HERE (WE CANNOT PROVIDE ANY SUPPORT OR SETUP ASSISTANCE WITH THIS APP OR ROOTING YOUR PHONE — USE AT YOUR OWN RISK)